Using Token2 hardware tokens and security keys to secure your Switch edu-ID account
 Switch edu-ID is the universal login for lifelong learning. Students and other users can access thousands of national and international services with Switch edu-ID. Swiss universities participate in the Switch edu-ID identity federation, which is orchestrated by the Switch Foundation. Within the federation, members of universities can access services of other universities with their Switch edu-ID login. All personal data remains in Switzerland under the direct control of Switch and the universities and is covered by Swiss data protection provisions.
In this guide, we will walk you through the process of securing your edu-ID account, enabling two-factor authentication, and adding a Token2 FIDO2 Security key as a passkey to be used for easy and secure login to your edu-ID account.
Prerequisites
- An active edu-ID account. If you don't have one, refer to the Registration section below
- A mobile phone (for SMS option), a smartphone (for TOTP App option), or a Token2 programmable hardware token to enable the two-factor authentication. This is a requirement to allow enrolling a FIDO2 key. Unfortunately, this downgrades the overall account security for edu-ID accounts, but this is a design decision that currently does not have any workaround.
- A FIDO2.1 Security key
Registration [optional]
If you don't already have an account with edu-ID, follow the steps below to create one. You can skip this section if you already have an account.
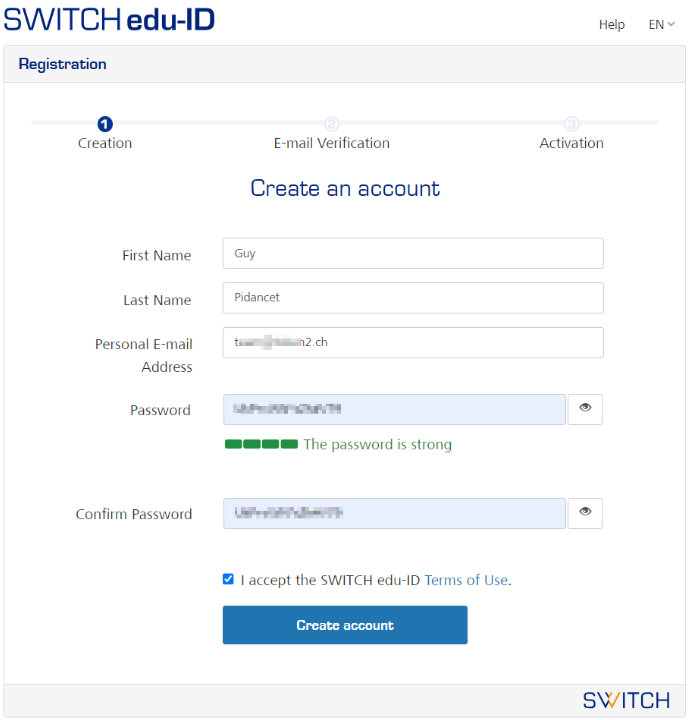
- Navigate to the registration page (https://eduid.ch/web/registration/) and fill the form as shown below:
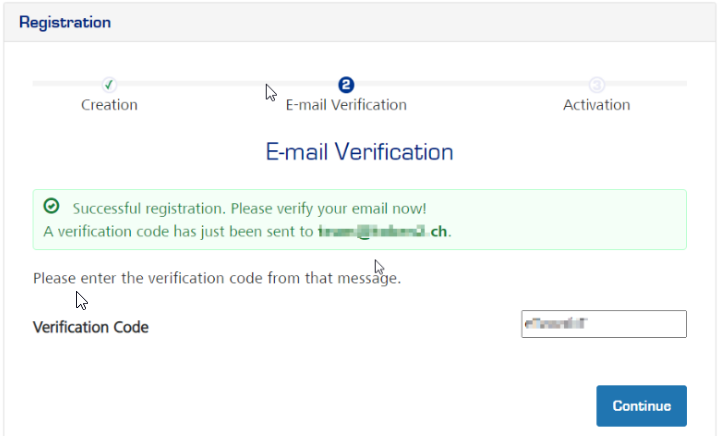
- Complete the registration by entering the email verification code:
- The system will take you to the account details page, described in the next section
Enable traditional MFA
As a prerequisite to enable a secure login method, edu-ID requires you to add at least one traditional (and insecure) MFA method. This can be an SMS method or TOTP. As a TOTP method, you will have an option of using a mobile app (such as Google Authenticator, Microsoft Authenticator, or Token2 TOTP+ or Token2 Mobile OTP) or a programmable hardware token. In this section, we will provide guidance using the programmable hardware token as an example.
- Log in to your edu-ID account and navigate to Account Details page (https://eduid.ch/web/change-account-data/)
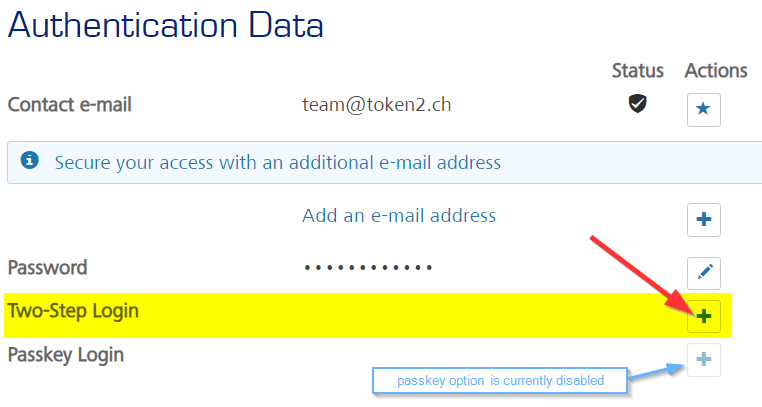
- Click on the "+" icon next to "Two-step Login" line
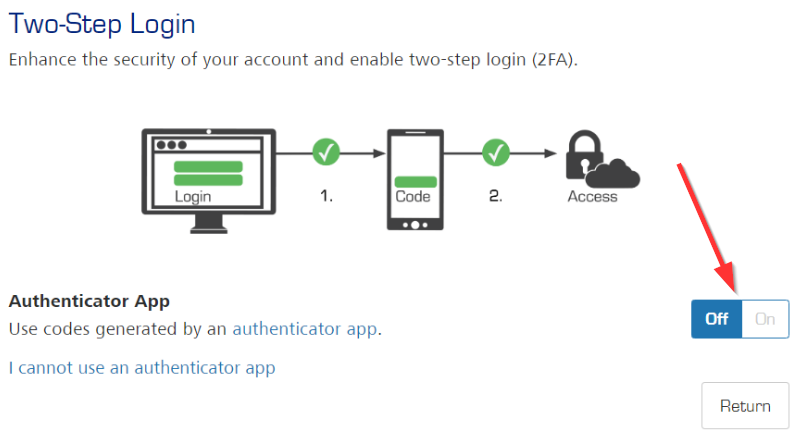
- Click on the "On" switch next to "Authenticator app" line. For SMS method, you can click on "I cannot use an authenticator app" link (but SMS method is not recommended and not covered in this guide)
- After clicking the "On/Off" element, a popup window should TOTP enrollment QR code should appear:
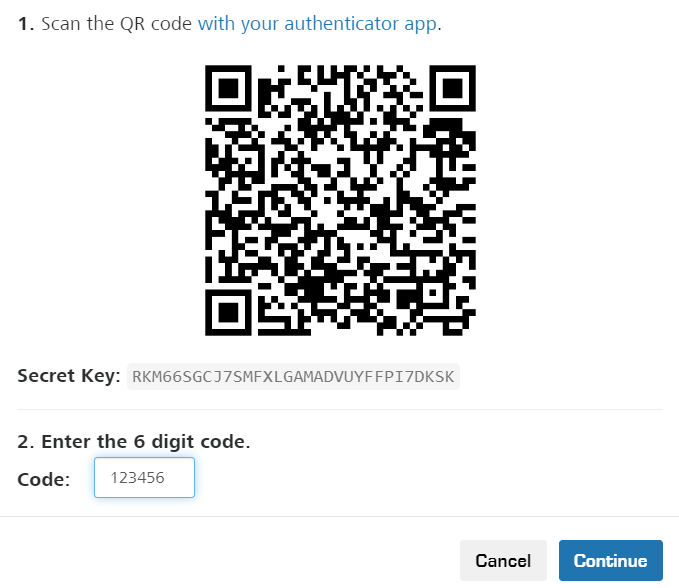
Follow the guides below to transfer the secret key to your hardware TOTP token (by typing in the secret key value or scanning the QR code):
- Launch the NFC burner app on your Android device and hit the "QR" button

- Point the camera to the QR code shown on the account page. Upon a successful QR scan, the camera window should disappear
- Turn on the token and touch it with your phone (make sure it is overlapped by the NFC antenna) and click "Connect" on the app
- Upon successful connection, click the "Burn seed" button (the button will become active only if NFC link is established).

- A message box similar to the one below will be shown upon successful completion

Follow the steps below to perform setting the seed for your token using Windows App.
1. Launch the exe file, then select the NFC device from the drop-down list and click on "Connect". You should see a message box notifying about a successful operation.
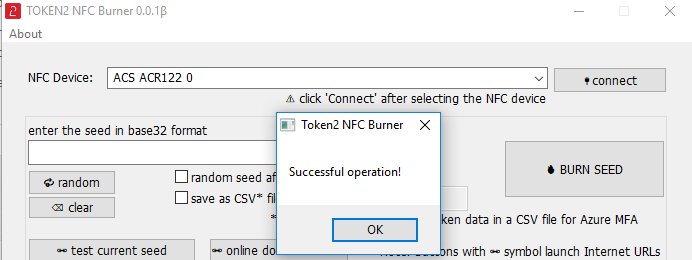
2. Enter or paste the seed in base32 format, or use one of the QR scanning methods to populate this field
3. Place the token onto the NFC module and wait for its serial number to appear.
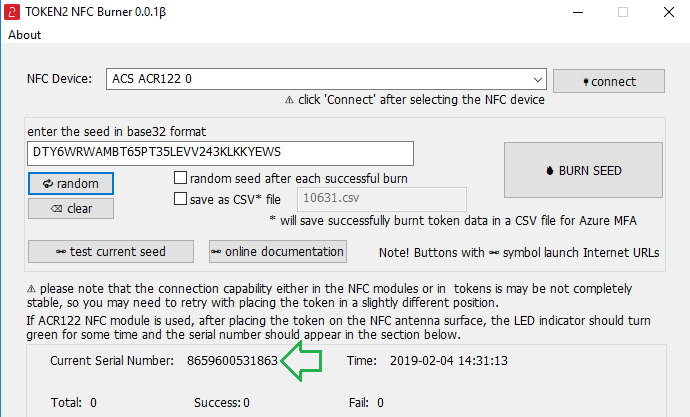
4. Click on "Burn seed" button. A log entry with the serial number and "Successful operation" text will be logged in the log window.

- Launch the NFC burner app on your iPhone device and hit the "scan QR" button

- Point the camera to the QR code shown on the account page. Upon a successful QR scan, the camera window should disappear and the seed field will be populated with the hex value of the seed. Touch the Burn button to continue.

- When an NFC prompt similar to the one below is shown, turn on the token and touch the top of your iPhone with the token.

- A message box similar to the one below will be shown upon successful completion

Please note that the procedures above are shown only as examples and are valid to single profile TOTP tokens only. The procedure for multi-profile and USB-programmable devices are similar but slightly different - Launch the NFC burner app on your Android device and hit the "QR" button
- Upon completing the hardware token provisioning, turn the token on and off again and enter the 6-digit OTP it generates into the Code field. Then, click Continue:

- Upon successful code verification, the system will ask for your mobile number (to be used as a backup 2FA method). Please note that if you plan to enroll passkeys later, you cannot skip this, as having a mobile phone registered is a prerequisite for enrolling a FIDO2 security key:
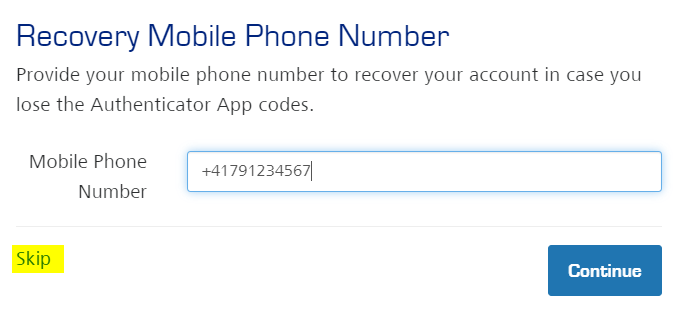
- On the next step, the system will ask you to save/print the list of Recovery Codes (these are to be used if you lose access to the previously configured 2FA methods):
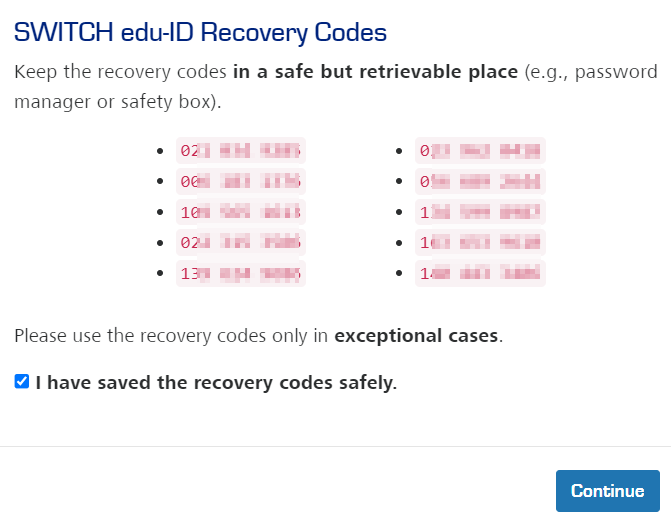
- Click on "Continue". This will complete the process of configuring your traditional MFA methods.
Enroll your Token2 FIDO2 Security Key
After a traditional MFA method was configured for your account, edu-ID will allow using passkeys (including FIDO2 security keys) to secure your account.
- Navigate to Account Details page again (https://eduid.ch/web/change-account-data/) and make sure Passkey option is enabled:
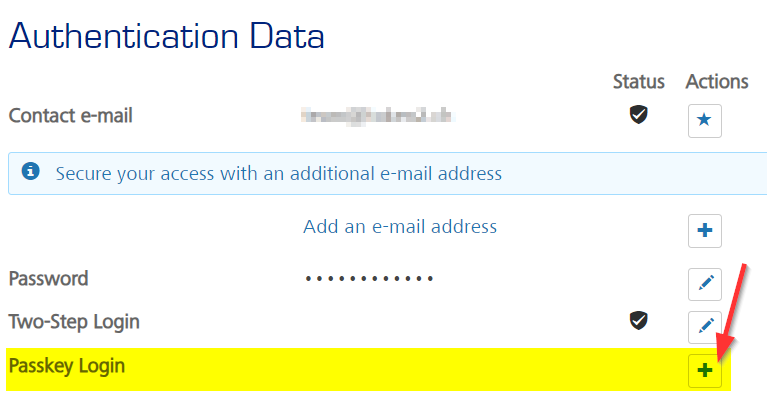
- Click on "+" icon to start the registration process. Please note that if you have not provided your mobile phone, the system will ask to add and verify it, this is a requirement for FIDO2 security keys and passkeys.
- On the next step, click on the "+" icon next to "Add a passkey" line:
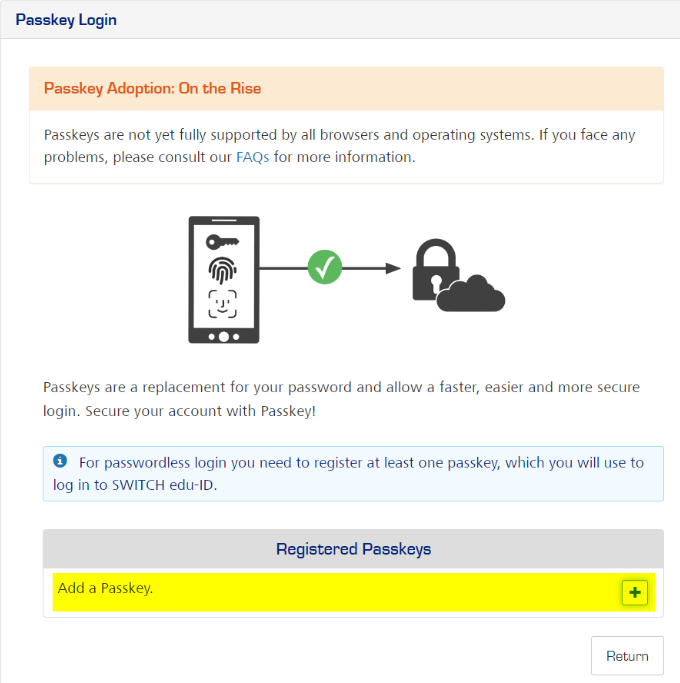
- Plug in your security key and continue with the steps below.
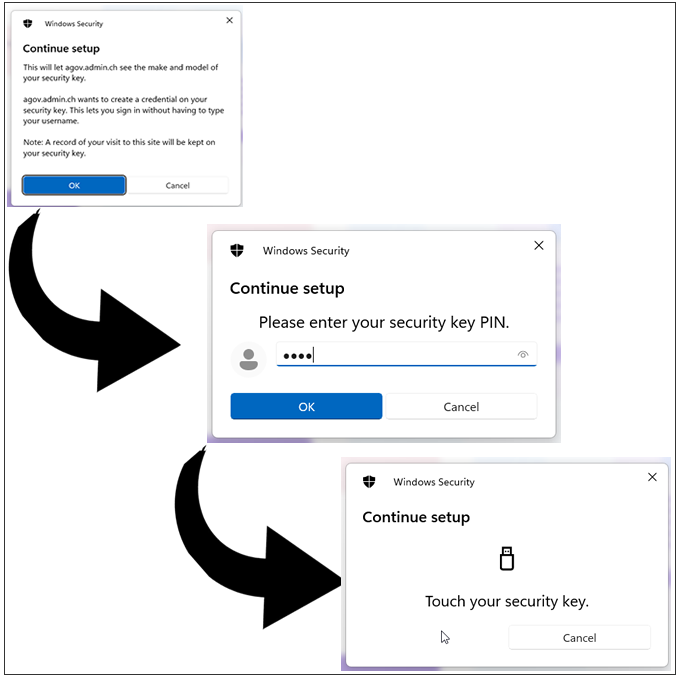
This will invoke the current browser to start the FIDO2 Security key registration process. The windows given below just as an example (Chrome under Windows) and may look differently with other browsers and/or operating systems.
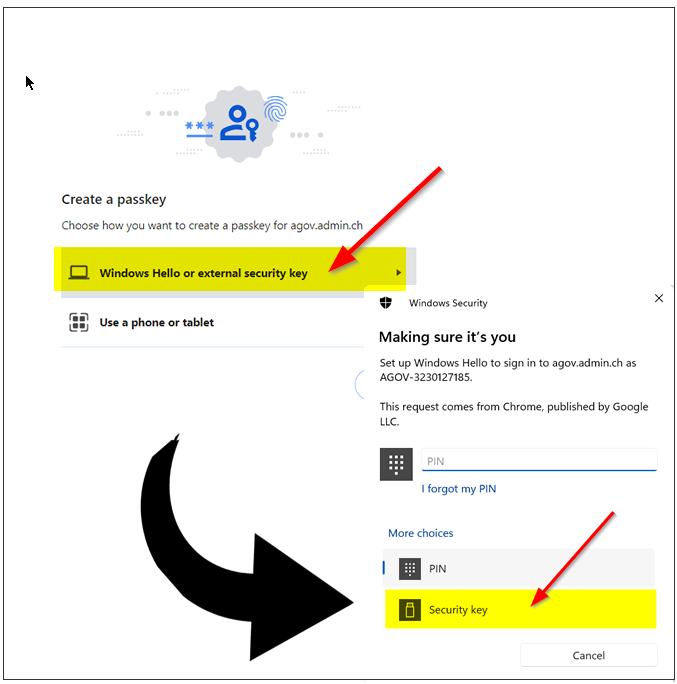
Please note that to use our FIDO2 keys, you have to select "External Security Keys" or "Security Key" options when prompted (and please note that this option is not always set as default, so please pay attention to that). Selecting a different option may lead to having your built-in authenticator (TPM on a PC motherboard or Touch ID on a macOS laptop) enrolled instead of the standalone security key.
Also, note that the system may ask to choose the authenticator option more than once (in case multiple platform authenticators are present). Make sure you always select the "Security Key" option. On the next step, the browser will ask you to allow the website to create a new resident credential (passkey) on your FIDO2 key. Then, it will ask you to enter your security key's PIN code (if you don't have a PIN code set on the key, you will be prompted to create it). Finally, it will ask to press a button (or tap in the case of NFC or swipe a finger in the case of a biometric FIDO2 key) to complete the process.
- On the next step, give this key a distinguishable name and click on Proceed:
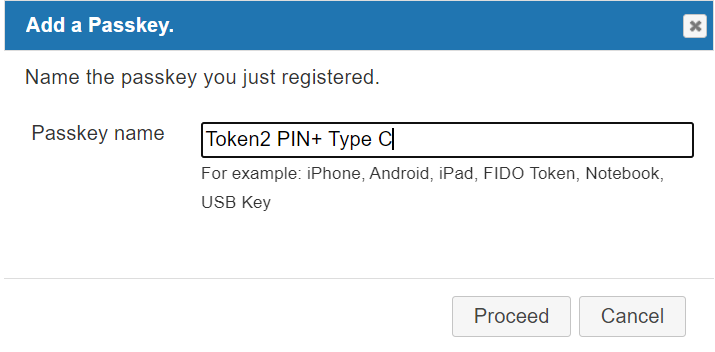
- This completes the registration process

Logging in with a Token2 FIDO2 Security key
Now, let's try to log in. Please log out of all existing edu-ID sessions and close the browser tab/window.
- Navigate to the main page of edu-ID (https://eduid.ch/), then enter your email address and click on "Login"
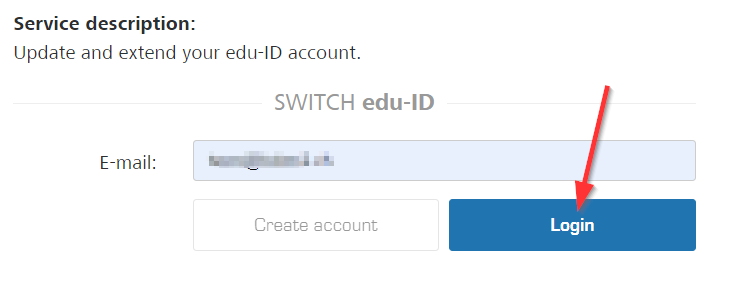
edu-ID has implemented passwordless access, but not yet usernameless access, so you still need to manually enter your email address here - On the next step, it will give you options to log in with a password, or a passkey - choose the latter
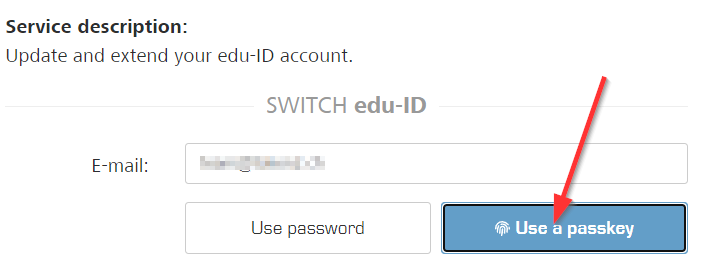
- Plug in your FIDO2 Security Key and continue as described below.
The browser will ask which type of passkey you want to use. Make sure you choose "External security key," similar to what was chosen during the registration process.
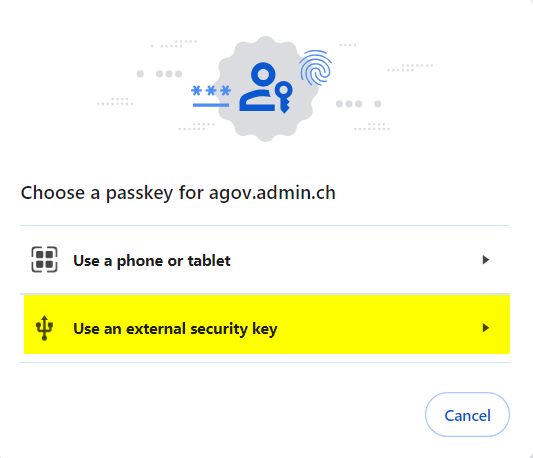
On the next step, the browser will prompt to plug your security key in. If already done, it will ask for your PIN code right away, following by the request to touch the button.
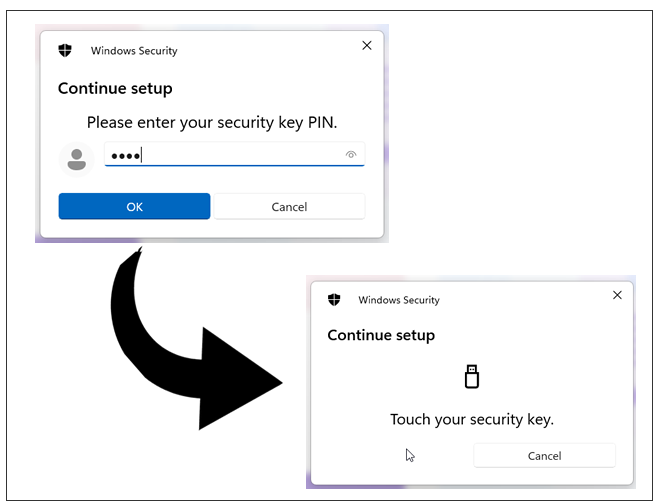
- This will complete the login process.
Subscribe to our mailing list
Want to keep up-to-date with the latest Token2 news, projects and events? Join our mailing list!
